Intro to BitBot β
Learn to code a dancing robot, make it light up with your favourite colours and follow a torch or line!
- Language
- JavaScript
- Est. Time
- 30–90min
- Difficulty
- Moderate
This workshop is in beta
It may be a little rough around the edges: tweet us if there's any issues.-
Let’s Go!
This workshop focuses on giving a BitBot robot commands using code, written in a language called JavaScript. It has motors, sensors and lights controlled by a Micro:Bit. We can also use JavaScript to make websites, apps and many other things.
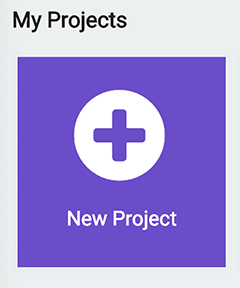
To get started, go to makecode.microbit.org and click New Project.
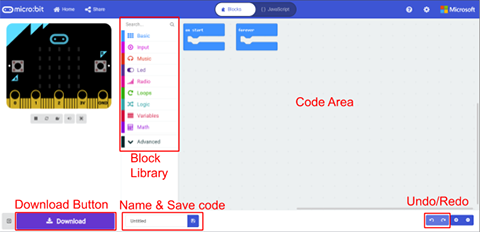
This’ll open a new project in the editor. We first need to add the BitBot libraries to the Micro:Bit editor, so click Advanced→Extensions in the Block Library on the left.
Search for ‘bitbot’ and click on
BitBot - Official Microsoft MakeCode package.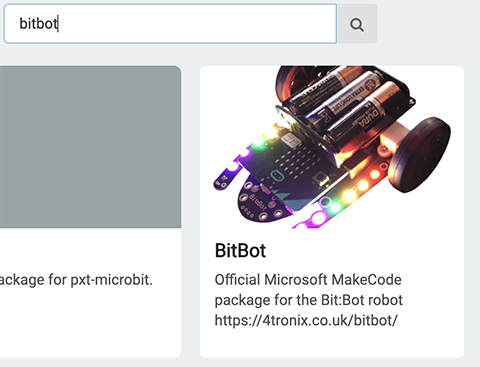
From there, go back to the editor and click {} JavaScript at the top, and you’re good to go!
-
Turn on the Lights
Let’s do some coding and test the BitBot is working by turning on it’s lights! At the moment, your code editor should read…
basic.forever(function () {

})
There’s a lot to learn here so we might come back to it – for now, replace it with (or type below it):
bitbot.neoRainbow()As you start typing, the editor will pop up suggestions of what you’re trying to type. You can select a completion from the list by pressing the up and down arrows on your keyboard to select the right one, and pressing the tab key.
Copying It to the Micro:Bit
Click the download button and the bottom of the screen and save the code (hex file) to the Micro:Bit.

The code will often download to your Downloads folder. You’ll need to open File Explorer (Finder on macOS), and copy the file to MICROBIT. On Windows, you can find MICROBIT in This PC or My Computer — on other operating systems, it’ll be wherever you find USB drives.
You should see a little yellow light flashing on the Micro:Bit (next to the USB port) while the hex file is copying over. Once it’s stopped flashing, unplug the USB cable and switch on the BitBot with the on/off switch!
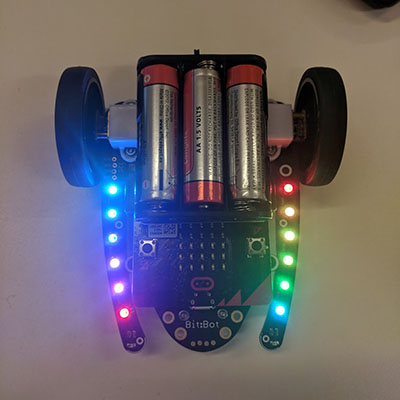
A BitBot to be Proud of
Hopefully when you turn on the BitBot you can see a rainbow of lights like so:
If it doesn’t look like this check your code and make sure it has downloaded to the right place. Also make sure you unplug the USB cable. If it’s still not working ask a helper for help.
Now switch off the BitBot.
-
Making it our own
Now the lights are working it’s time to customise them!
Delete the line you added above, and replace it with the line:
bitbot.neoSetPixelColor(0, bitbot.BBColours(BBColors.Red))Download it to your Micro:Bit and see what happens!
We Need More Colours…
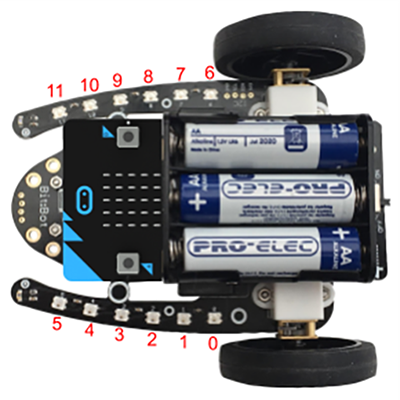
Next, see if you can make another LED light up a different colour. You can see on the BitBot that each LED is numbered…
Duplicate and amend this line for all of the LEDs you’d like to set the colour of. When you’re happy with your code, click Download and save it to the Micro:Bit. Once it’s finished copying to the Micro:Bit and the USB light has stopped flashing, unplug the USB cable and switch on the bitbot. Are the lights working like you expected?
Take Your Time
You could also try adding lines that read:
basic.pause(200)Try adding this line in between two lines that turn on LEDs. What do you think this will do?
For Smart Cookies (Extension)
A for loop allows us to repeat code without typing it again and again. It has the form:
for (<start>; <condition>; <each_time>) {
  <code>
}
<then>
where
<start>contains instructions to perform before the first time the<code>runs, and the<condition>tells the computer whether to loop again or skip to<then>. For example, what do you expectxto equal after the following code has run?let x = 0 for (let i = 1; i < 5; i++) { // i++ adds 1 to i x += i // x += i adds i to x } x -= 5 // What do you think this does?The answer is:
x = 0 + { 1 + 2 + 3 + 4 } - 5 = 5
Try using a for loop to animate the lights! You can also make it run forever by wrapping your code with:
basic.forever(() => {
  <code>
})
// Animated lights example basic.forever(() => { bitbot.neoRainbow() for (let i = 0; i < 12; i++) { // i++ adds 1 to i basic.pause(200) bitbot.neoSetPixelColor(i, bitbot.BBColours(BBColors.Black)) } }) -
Making It Move
Remember the code we started with?
basic.forever(function () {

})
Code you put in the gap will loop forever! Let’s test this out by getting your BitBot to move. Copy the code below into the editor:
basic.forever(() => {
  bitbot.driveMilliseconds(600, 400)
  basic.pause(500)
})
This code will make the bitbot drive forward at speed 600 for 400 milliseconds (or 0.4 seconds), then pause for half a second (500ms)… and repeat it forever!
() => {}andfunction () {}are very similar, and define functions (blocks of code, which we can give names and reuse). There’s subtle differences we won’t get into here as they don’t affect us with what we’re doing. If you’re really curious, you can learn more on the MDN web docs.Download it to your Micro:Bit. Remember: once the USB light on the Micro:Bit has stopped flashing, unplug the USB cable and switch on the bitbot.
Is the bitbot moving? Does the code behave like you think it should? If so, now switch off the bitbot.
Now, try changing the speed of the motors (the maximum speed is 1023, and you can only use integers/whole numbers). Try negative numbers - what do you think will happen?
Like a Spinning Top…
You can also make your Bit:Bot spin clockwise by replacing the line
bitbot.driveMilliseconds(600, 400)with the line:bitbot.driveTurnMilliseconds(BBRobotDirection.Right, 600, 400)Try changing the direction, speed and duration of the turn, and combining driving, turns, pauses and lights to make a little disco robot. If you get stuck, you can click on Blocks at the top to see your code as blocks!
// Dancing Example
bitbot.neoRainbow()
basic.forever(() => {
  bitbot.driveMilliseconds(600, 400)
  basic.pause(500)
  bitbot.driveTurnMilliseconds(BBRobotDirection.Left, 200, 1000)
  bitbot.driveMilliseconds(-600, 400)
  basic.pause(200)
  bitbot.driveTurnMilliseconds(BBRobotDirection.Right, 1023, 300)
})
Remember to switch off the BitBot while you code!
-
Line Following
On the bottom of your BitBot you’ll see two line sensors:
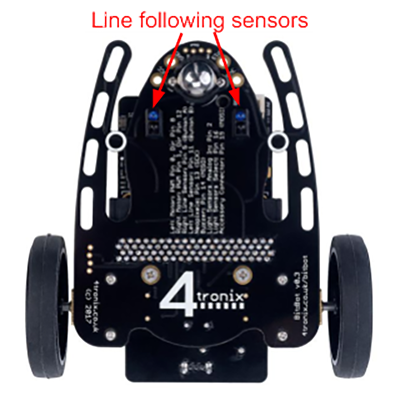
We’re going to use these line sensors to tell the bitbot to follow a line.

If This Then That
To follow a line, we need to do the following:
- If the left line sensor detects a line, then spin left;
- Else If the right line sensor detects a line, then spin right;
- Else drive straight on.
We can express this in code using an if statement, which takes the form:
if (<condition>) <then>             // <then> can only be one line of code
else if (<other_condition>) <then>
else <otherwise>

// or

if (<condition>) {
  <then>                            // <then> can be as much code as you like
                                    //   if you add parentheses around it!
} else if (<other_condition>) {
  <then>
} else {
  <otherwise>
}
Note the brackets around the condition! We can turn “if the left line sensor detects a line, then spin left” into the code:
basic.forever(() => {
  if (bitbot.readLine(BBLineSensor.Left)) {
    bitbot.driveTurn(BBRobotDirection.Left, 300)
  }
})
Delete your
foreverloop and replace it with the code above. Can you do the other conditions from above on your own? Once you’ve finished your code, download it to the Micro:Bit and switch on the BitBot to test it out. If you’re stuck ask for help.// Line following basic.forever(() => { if (bitbot.readLine(BBLineSensor.Left)) { bitbot.driveTurn(BBRobotDirection.Left, 300) } else if (bitbot.readLine(BBLineSensor.Right)) { bitbot.driveTurn(BBRobotDirection.Right, 300) } else { bitbot.drive(300) } })Why not add LEDs to show when the bitbot is turning left and right?
Setting an LED to black turns it off.
-
Do You Have the Lämp Bröther?
Now we’ve done line following, how about light following? Just like the line following sensors, the BitBot has two light following sensors:

You can get the amount of light hitting the left sensor (an integer between 0 and 1023) by writing:
bitbot.readLight(BBLightSensor.Left)`You can swap
LeftwithRightto get the amount of light hitting the other sensor.Try writing some code to control the speed and direction of the motors depending on the amount of light hitting the sensors! You can control the speed an individual motor by writing:
bitbot.motor(BBMotor.Left, 600)// Simple light following basic.forever(() => { bitbot.motor(BBMotor.Left, bitbot.readLight(BBLightSensor.Left)) bitbot.motor(BBMotor.Right, bitbot.readLight(BBLightSensor.Right)) })// Advanced light following const lbg = bitbot.readLight(BBLightSensor.Left) const rbg = bitbot.readLight(BBLightSensor.Right) basic.forever(function () { const lls = bitbot.readLight(BBLightSensor.Left) - lbg const rls = bitbot.readLight(BBLightSensor.Right) - rbg if (Math.abs(lls - rls) < 64) bitbot.drive(300) else if (lls > rls) { bitbot.driveTurn(BBRobotDirection.Left, 300) } else { bitbot.driveTurn(BBRobotDirection.Right, 300) } }) -
Is This Art?
Before continuing, put your robot onto at least 3 layers of flipchart paper or similar — we don’t want to mark tables or the floor!
Let’s put a Sharpie® (other marker brands are available) into the pen holder on the back of your robot, and make some art!
Now, turn on your robot and let it dance. What does it draw?

Lets draw something pretty, like a flower. Lots of flowers have rotational symmetry, meaning that they look exactly the same from different angles. We can recreate this using for loops!
For example, to draw something like a daffodil we can write:
basic.pause(2000)
for (let i = 0; i < 6; i++) {
    bitbot.driveTurnMilliseconds(BBRobotDirection.Left, 300, 335)
    basic.pause(100)
    bitbot.driveMilliseconds(300, 200)
    basic.pause(100)
}
Try lots of repetitions so that petals overlap. What do you think?
How might you draw a rose? A hint: your BitBot should draw shorter lines as it goes around. How might you do this?
-
Challenge Complete!
You should now know a bit about if statements, for loops, coding in JavaScript, dancing and generative art.